
Introduction
| Understanding this lesson requires a minimal understanding of PsyToolkit experiment scripts. You need to understand that there are blocks and tasks. When you read this, you probably already know how to set up a basic experiment. |
Before your participants can do a task, you need to give them instructions. Typically, you would this as follows:
| If you just want to update new or translated instructions, this lesson is still good to read. It will explain where in the code the instructions are. |
Step 1: Plan
First think about what it that participants need to understand. Take some paper, and write on each page what you want participants to read about the task.
Take the following two tips into account:
| If people do not understand your task, they will make many mistakes or just completely stop. |
| People do not understand jargon. Your study might be about working memory, but your participants might never heard about working memory. Only use words you are sure your participants know. |
| Make your instructions engaging and nice (maybe with some pictures). Otherwise, participants will already bored before they even start your task. |
Step 2: Decide
You can do instructions purely as text or with images. As text is quicker and easier, but with images, the instructions often look better.
| If your experiment is just for testing or if it is very easy, you can use texts. |
If you want to just texts, goto Text only instructions. first.
Step 3: Draw
Now you need to use drawing software to make you images. You can choose quite different software, here are some examples with difficulty level of learning.
-
Easy: LibreOffice Draw
-
Medium-Advanced: Inkscape
| If you want to change an existing experiment, check if it comes with an Inkscape svg file. You can then find the stimuli in there. A number of example experiments come with such a stimulus file. |
| You can also use something like paint, although it is not really the best software. It is better to spend a bit time in learning a new skill and how to make a good "drawing" with text and images. |
Step 4: Export
Whatever your software you used for making your instruction drawing(s), you need to make sure to save your drawing in one of the common bitmap formats, such as PNG, JPG, or BMP.
| Make sure your image is not larger than your resolution. The standard resolution of PsyToolkit experiments is 800 wide and 600 pixels wide. |
Step 5: Upload on PsyToolkit
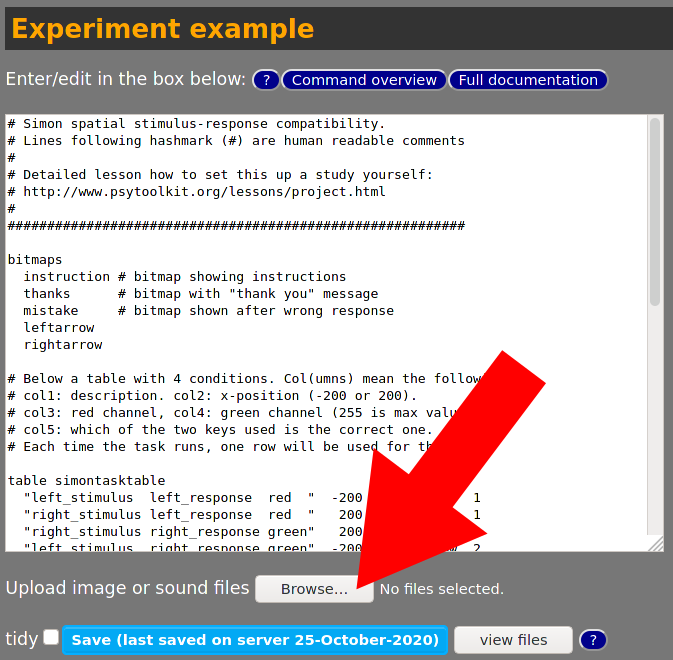
Now upload the new drawing files to your PsyToolkit account. Go to your experiment and click "Upload image or sound files" under text box where you have your experiment code. You can select one or more files.
Step 6: Add code
In your bitmaps section, make sure you have added your instruction stimuli.
Imagine you have two images, called instruction1.png and instruction2.png. If that is the case, and if you have uploaded those (previous step), then you would add this to your code first:
bitmaps
  instruction1
  instruction2
Now PsyToolkit knows which images are needed in your code.
Step 7: Add more code
Now add the instructions to your block. There are different ways to do it, choose what is easiest
Method 1: pager
The pager method is nice when you have relatively complex instructions through which participants can go backward and forward. People can use the up and down keys on the keyboard to go forward and backward, use the space bar to go forward. They need to use the q button to "quit". This way, they cannot unwillingly easily exit the instructions (it takes extra effort to press q).
| The pager line is what is being explained here. The rest is just based on the assumption you have a task. This lesson assumes you already know this. If not, learn more here. |
block test
  pager instruction1 instruction2
  tasklist
    mytask 10
  end
Method 2: message
The message method is nice when you have relatively simple instructions which only need to be read once.
block test
  message instruction1
  message instruction2
  tasklist
    mytask 10
  end
Text only instructions in blocks
It is possible to just use texts. There are the following examples in blocks.
The message with text.
The message with text shows one line of text and then waits for a key press. You can say which key or space by default.
block test
  message "Memorize words. Press space bar to start."
  tasklist
    mytask 10
endblock test
message "Memorize words. Press key x to start." x
tasklist
mytask 10
endJust show a text in blocks
| This lesson is generally correct, but some features work best in the upcoming version 3.3.2. |
You can show texts at different screen X/Y positions. This does show the text and does not wait for a key press.
| This is different than in tasks. So look carefully at the examples. |
block test
  text "In this task, you need to memorize words" 0 -100
  text "Press the space bar to start." 0 0
  wait_for_key
  tasklist
    mytask 10
end| The 0 -100 and the 0 0 are XY coordinates on the screen. 0 0 is the center, and negative coordinates go left or up from the screen center. |
block test
  text "In this task, you need to memorize words" 0 -100
  text "It is not difficult." 0 0
  text "Press the key h to start." 0 100
  wait_for_key h
  tasklist
    mytask 10
  end