
Overview
| This is an advanced topic that requires an understanding of more basic PsyToolkit experiment coding. |
You learn:
-
how to use arrays in PsyToolkit.
-
how to use the new tablerow instruction to force tablerow setting.
Introduction
PsyToolkit has different types of storing information temporarily. Normally, you can store numbers in local or global variables.
Sometimes, it is good to store a whole sequence of numbers. That is what you can use arrays for. Arrays are also variables, but instead of storing just one number in them, they have a sequence of numbers (or words/letters), such as 1,2,3,4 or 4,9,10,12,8 any other sequence in whatever order.
| PsyToolkit aims to make programming simple and straightforward — arrays can at first look a bit more complicated, but in reality, it is straightforward. |
What an array looks like in PsyToolkit
A numerical array starts with &&
An array of words/letters starts with %%
Thus &&x refers to a sequence of numbers called "x".
Remember, a normal local variable starts with a $ and a normal global variable with an &.
Alternatively, you can have arrays of text variables, they start with %%. In this lesson we focus on arrays with (whole) numbers.
How to define an array in PsyToolkit
In PsyToolkit, global variables (those that can maintain values throughout different trials and blocks) start with an &. Arrays are always global, that is, they maintain values throughout different trials and blocks. They start with &&, that is, with two & signs.
For example, you can simply create a new array with the set instruction, followed by the name of the array (starting with &&), and then some values. In the example below, we just put the values 1, 3, 7, and 10 into the array called &&a.
set &&a 1 3 7 10
There are many different ways of putting values into an array, which can be read in the documentation here which comes with more examples.
You can do things such as sorting arrays or putting them in a random order.
Run the demo
This is a demonstration of a visual search paradigm in which you need to find an orange T among distractors (blue T or upside down orange T). Press space bar only when an orange T is present. Each trial randomly creates a stimulus display with some needed constraints.
The complete code listing
Here you see the complete script, just so you know what it looks like. Below, we will take it apart and explain it bit by bit (in "the code explained").
options
  bitmapdir stimuli

bitmaps
  target        # 1
  distractor1   # 2
  distractor2   # 3
  empty         # 4
  aims
  mask1
  mask2
  fixpoint
  frame
  therewasnone
  toolate

## array is 5 by 5
## set size will be 5 10 15 or 20

# meaning of table columns
# 1) setsize
# 2) how many empty locations in search matrix
# 3) how many distractors of type 1 (upside down T)
# 4) how many distractors of type 2 (blue T)
# 5) whether or not there is a target in the display (1=yes,2=no target)

table searchconditions
  5   20 2 2   1
  10  15 4 5   1
  15  10 7 7   1
  20  5  10 9  1
  5   20 3 2   0
  10  15 5 5   0
  15  10 7 8   0
  20  5  10 10 0

task search
  ## choose a table row
  set $tr &&my_trials remove first
  tablerow $tr
  ## create search matrix which has 5x5 spaces
  set &&empties 4 times @2
  set &&distractor1set 2 times @3
  set &&distractor2set 3 times @4
  set &&searchset clear ## contains the bitmap numbeers
  if @5 == 1
    set &&searchset append 1 ## bitmap one is the target stimulus (see bitmap list)
  fi
  set &&searchset append &&empties
  set &&searchset append &&distractor1set
  set &&searchset append &&distractor2set
  set &&searchset shuffle no_repeat 1 5
  #
  keys space
  show bitmap fixpoint # stimulus 1
  delay 100
  clear 1
  delay 400
    show bitmap &&searchset[1]  -140 -180 # stimulus 2
    show bitmap &&searchset[2]   -70 -180
    show bitmap &&searchset[3]     0 -180
    show bitmap &&searchset[4]    70 -180
    show bitmap &&searchset[5]   140 -180
    #
    show bitmap &&searchset[6]  -140 -110
    show bitmap &&searchset[7]   -70 -110
    show bitmap &&searchset[8]     0 -110
    show bitmap &&searchset[9]    70 -110
    show bitmap &&searchset[10]  140 -110
    #
    show bitmap &&searchset[11] -140  -40
    show bitmap &&searchset[12]  -70  -40
    show bitmap &&searchset[13]    0  -40
    show bitmap &&searchset[14]   70  -40
    show bitmap &&searchset[15]  140  -40
    #
    show bitmap &&searchset[16] -140   30
    show bitmap &&searchset[17]  -70   30
    show bitmap &&searchset[18]    0   30
    show bitmap &&searchset[19]   70   30
    show bitmap &&searchset[20]  140   30
    #
    show bitmap &&searchset[21] -140  100
    show bitmap &&searchset[22]  -70  100
    show bitmap &&searchset[23]    0  100
    show bitmap &&searchset[24]   70  100
    show bitmap &&searchset[25]  140  100
  readkey 1 4000
  if STATUS == CORRECT # means space pressed, might be incorrect if there was not target
    if @5 == 0 # there was none
      show bitmap therewasnone 0 200
      delay 2000
      clear -1
      delay 500
      set $x 1
    fi
  fi
  if STATUS == TIMEOUT # means space pressed, might be incorrect though
    if @5 == 1 # there was one, now show it on yellow background
      set &where_is_target &&searchset locate 1 ## where 1 is in the search set of 16
      set &where_is_target increase ## stimuli start with value 2 (fixpoint is first)
      set $target_x getx &&where_is_target
      set $target_y gety &&where_is_target
      show bitmap frame  $target_x $target_y
      show bitmap target $target_x $target_y
      show bitmap toolate 0 200 # 22
      delay 2000
      clear -1
      delay 500
      set $x 1
    fi
  fi
  ## show mask
  show bitmap mask1
  delay 100
  show bitmap mask2
  delay 100
  clear screen
  delay 1000
  save BLOCKNAME @1 @5 $x RT &&searchset

#----------------------------------------------------------------------
# blocks
# ----------------------------------------------------------------------

message aims

block block1
  set &&my_trials range 1 8
  set &&my_trials append &&my_trials
  set &&my_trials shuffle no_repeat
  tasklist
    search 16
  end
  feedback
    set &RTfive    mean c5 ; select c3 == 1 && c4 ==0 && c2 == 5
    set &RTten     mean c5 ; select c3 == 1 && c4 ==0 && c2 == 10
    set &RTfifteen mean c5 ; select c3 == 1 && c4 ==0 && c2 == 15
    set &RTtwenty  mean c5 ; select c3 == 1 && c4 ==0 && c2 == 20
    text 0 0 "Search time (ms)"
    text 0  50 &RTfive    ; prefix "With  5 items: " ; postfix " ms"
    text 0 100 &RTten     ; prefix "With 10 items: " ; postfix " ms"
    text 0 150 &RTfifteen ; prefix "With 15 items: " ; postfix " ms"
    text 0 200 &RTtwenty  ; prefix "With 20 items: " ; postfix " ms"
    text 0 250 "Press space bar to continue"
  end
The code explained
The first part is similar to other experiments. We tell PsyToolkit that the stimuli are in a bitmapdir which we call stimuli. This is only necesary if you want to put your stimulus files in a subfolder (or subdirectory). It is a bit cleaner to do so.
This is then followed by the stimulus files. Note that we just provide the name without the file extension. Thus, there is in this case a file called target.png, but we only tell PsyToolkit that we want to use a file called target. In the comment line (following #), I point out that this first bitmap on the list corresponds to number 1. We can use that for easier coding. There are in total more than 4 stimuli, but for the sake of commenting, I only used the first four, because their bitmap numbers are used.
| Note that I use the hashmark (#) with a number. These are just comments to remind people that the bitmat target corresponds to number 1, distractor1 corresponds to bitmap number two, and so on. Comments can help to make code more easily readable. |
options
  bitmapdir stimuli

bitmaps
  target        # 1
  distractor1   # 2
  distractor2   # 3
  empty         # 4
  aims
  mask1
  mask2
  fixpoint
  frame
  therewasnone
  toolate
We use a table. A table contains rows and columns. In this case, we have 5 columns, each having a different meaning. The idea is that on each trial, a different row is being used. Each row provides different parameters for the condition.
Here is the meaning of the columns in this experiment (in each experiment, you can, of course, give whatever meaning you want to give them):
Important for this task is that we have a display of in total 25 places. We write some code to fill these places with a visible stimulus or with an empty placeholder. Note that columns 3, 4, and 5 add up to the total number of stimuli displayed in a given trial.
-
Column 1: The total number of stimuli presented in a so called search display
-
Column 2: The number of empty spaces not being used in the current trial
-
Column 3: The number of orange upside down distractors
-
Column 4: The number of blue T stimuli (also distractors)
-
Column 5: Whether there is a target (1) or not (0)
table searchconditions
  5   20 2 2   1
  10  15 4 5   1
  15  10 7 7   1
  20  5  10 9  1
  5   20 3 2   0
  10  15 5 5   0
  15  10 7 8   0
  20  5  10 10 0
Now we start the task. That is, we describe what happens in one trial. In that trial, we choose a row from the table. Normally, PsyToolkit does this itself, but in this specific instance, we force within the task the tablerow to be used with the tablerow instruction.
The line tablerow $tr sets the table row to a value that the line before was taken from an array called &&my_trials, which holds a sequence of numbers. In this experiment, the table has 8 rows. The &&my_trials array holds each row number twice. This way, there will be two trials that use the first row of the table, there will be two trials that use the second row of the table, and so on. You will see further below how exactly &&my_trials was constructed. Here, in the task, we just take the first value from it. After that, &&my_trials will hold one less number, thus 15 numbers in total. We go on until &&my_trials is totally empty.
task search
## choose a table row
set $tr &&my_trials remove first
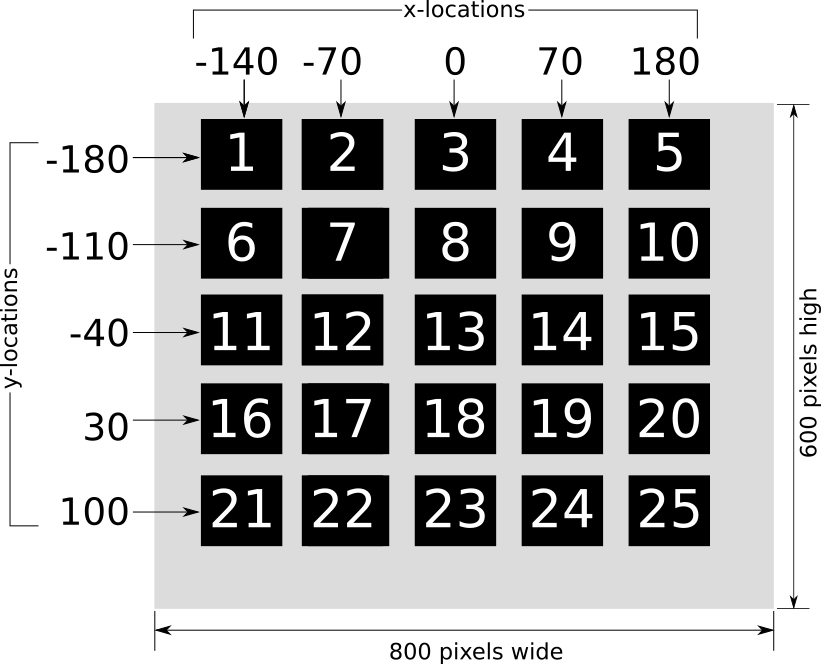
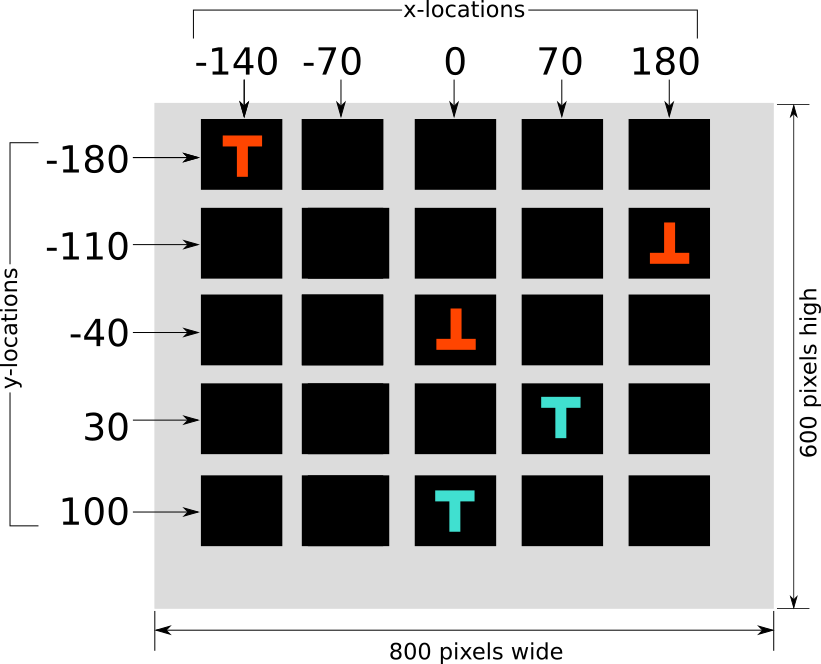
tablerow $trNow we are going to create the content of the search display. The search display consists in total of 25 possible places (5x5) (see picture below). These 25 places are being displayed further down on specific positions on the 800x600 drawing area we have (the resolution).
Now, remember that the second column of the table says how many empty places there are. An empty place is actually a black bitmap (black on black, thus invisible), and the empty bitmap has value 4. That is why we create an array filled with value 4 for a number of times (as specified by column2, denoted as @2). This is sort of difficult to understand at this point, but just go on, and later when you reread this lesson you will follow it.
And that might be filled as such for a search display of 5 stimuli.
  ## create search matrix which has 5x5 spaces
  set &&empties 4 times @2
Now, we do something very similar for the distractorsets. &&distractor1set contains the orange upside down T stimuli and distractor2set the blue T stimuli.
  set &&distractor1set 2 times @3
  set &&distractor2set 3 times @4
Next, we clear the array &&searchset (it might still be filled with values from the previous trial). And then, in case a target (orange T) is to be shown, we append the value 1 to the array &&searchset. As you see in the example of a display of 5 stimuli, the orange T is indeed at the first presented position, thus &&searchset[1] contains the value 1 (1 is the bitmap value corresponding to the target, the orange T).
  set &&searchset clear ## contains the bitmap numbeers
  if @5 == 1
    set &&searchset append 1 ## bitmap one is the target stimulus (see bitmap list)
  fi
And next, we also append the &&empties and the two distractor set arrays. In total, the &&searchset array will have in total 25 bitmap numbers, and later on, we can simply display these one by one on the 25 places in the search display (see search display image).
  set &&searchset append &&empties
  set &&searchset append &&distractor1set
  set &&searchset append &&distractor2set
  set &&searchset shuffle no_repeat 1 5
Now we go on. We tell PsyToolkit that participants can only use one key of the keyboard, namely the space bar, which they need to press in case a target stimulus is present.
After that, we show a fixation point, wait 100 milliseconds, remove the fixation point, and then wait 400 milliseconds.
  keys space
  show bitmap fixpoint # stimulus 1
  delay 100
  clear 1
  delay 400
Now we display the search display. We have already created the &&searchset array, and now we present each of ts values one by one over the 25 possible spaces, starting from the top left, all the way going down to the bottom right stimulus at screen location 140,100.
Note that the square brackets here tell PsyToolkit that we take a specific value from the array. For example, &&searchset[1] corresponds to the first value in the array. This value will, in this specific experiment, be 1 (the orange T), 2 (the first stractor, an upside down T), 3 (the second distractor, the blue T), or 4 (an black square, which we call empty).
    show bitmap &&searchset[1]  -140 -180 # stimulus 2
    show bitmap &&searchset[2]   -70 -180
    show bitmap &&searchset[3]     0 -180
    show bitmap &&searchset[4]    70 -180
    show bitmap &&searchset[5]   140 -180
    #
    show bitmap &&searchset[6]  -140 -110
    show bitmap &&searchset[7]   -70 -110
    show bitmap &&searchset[8]     0 -110
    show bitmap &&searchset[9]    70 -110
    show bitmap &&searchset[10]  140 -110
    #
    show bitmap &&searchset[11] -140  -40
    show bitmap &&searchset[12]  -70  -40
    show bitmap &&searchset[13]    0  -40
    show bitmap &&searchset[14]   70  -40
    show bitmap &&searchset[15]  140  -40
    #
    show bitmap &&searchset[16] -140   30
    show bitmap &&searchset[17]  -70   30
    show bitmap &&searchset[18]    0   30
    show bitmap &&searchset[19]   70   30
    show bitmap &&searchset[20]  140   30
    #
    show bitmap &&searchset[21] -140  100
    show bitmap &&searchset[22]  -70  100
    show bitmap &&searchset[23]    0  100
    show bitmap &&searchset[24]   70  100
    show bitmap &&searchset[25]  140  100
Now that the display is ready, we wait for up to 4000 ms until the participant presses the first key of the list of keys we gave. We said there is only one possible key (space), so we say that we expect that key 1 is the expected key.
readkey 1 4000Now that the display has been shown and button has been pressed (or not), we are going to check if the response was correct or not. If you already know how this works in PsyToolkit, you can further skip it.
For this experiment, we say that a correct response will get value 0 in the data file, and an incorrect response value 1. That is just a way of coding this, you can also take other values.
We use a variable called $x to store whether the participant responded correctly or not. We use a so called "local" variable here (starting with a $). The nice thing about them is that they are at the start of each trial reset to value 0.
We will set it to value 1 in case it turns out the participant made a mistake.
There are two reasons why that could happen. Either a person did not respond while there was a target (orange T), that is a so-called "TIMEOUT" (that happens when the person did not press a button during the readkey waiting time). Alternatively, the person could have pressed a button, which PsyToolkit in this case will have coded as CORRECT (because we said that we expect key 1 one to be pressed) — that is, however, incorrect in case there was no target (orange T).
Thus, we first check if a key was pressed (if STATUS == CORRECT) and then we check in the current trial’s table row if there was a target. If @5 (the fifth column of the currently chosen row) was value 0. In that case, we present a bitmap with an error feedback message (therewasnone) and show that for 2 seconds (2000 ms), then clear that from screen, wait another half a second (500 ms) and then set the value of $x to 1 (meaning that there was an error).
  if STATUS == CORRECT # means space pressed, might be incorrect if there was not target
    if @5 == 0 # there was none
      show bitmap therewasnone 0 200
      delay 2000
      clear -1
      delay 500
      set $x 1
    fi
  fi
Similarly, we check if people did not respnd if there was actually an orange T. In this case, we do not only show an errormessage (toolate), we also put a frame around the actual location of the orange T, in case the participant still did not know where it was on the screen.
Note that the getx and gety provide the X and Y position of the stimulus.
For this, we search in &&searchset for the location in the array that holds a value 1 (that is the value of a target bitmap). For example, if the orange T was in the top left corner of the screen, the location would have been the first square of the search display, and that means &where_is_target would have been value 1.
| Use pen and paper to draw this out yourself. It is likely, at first sight, quite complicated, but once you get it, it is not so difficult. |
  if STATUS == TIMEOUT # means space pressed, might be incorrect though
    if @5 == 1 # there was one, now show it on yellow background
      set &where_is_target &&searchset locate 1 ## where 1 is in the search set of 16
      set &where_is_target increase ## stimuli start with value 2 (fixpoint is first)
      set $target_x getx &&where_is_target
      set $target_y gety &&where_is_target
      show bitmap frame  $target_x $target_y
      show bitmap target $target_x $target_y
      show bitmap toolate 0 200 # 22
      delay 2000
      clear -1
      delay 500
      set $x 1
    fi
  fi
Now we show to masking stimuli. This is just standard showing of stimuli.
  show bitmap mask1
  delay 100
  show bitmap mask2
  delay 100
  clear screen
  delay 1000
Finally, we save the relevant data to the output data file. For each trial, there will be one line in the data file. We even write out all the values in the &&searchset, that is 25 values.
save BLOCKNAME @1 @5 $x RT &&searchsetAnd that is the END of the trial description. Next we go to the blocks. First, we will use the instruction "aims" (a bitmap) and wait for the participant to press the space bar to continue.
We show an image which contains the instructions (you can make that with a drawing program such as Inkscape or paint or whatever drawing program you like — I prefer Inkscape). I include the raw SVG Inkscape file in the downloadable file.
message aimsNow we start the block. A block is a way to "block" trials together. So here we start a block and we do three things in it:
-
Set the trial sequence used in the block (there will be 16 trials)
-
Do 16 visual search trials (there are different conditions)
-
Give feedback to the participant after the 16 trials have been done.
block block1Next, we will tell PsyToolkit to do 2 trials of each of the 8 table rows. That means, for example, that there will be two trials of a search display of 5 stimuli with a target present.
First, we simply create an array called &&my_trials and put the range 1 to 8, that is sequence 1,2,3,4,5,6,7,8 into it.
set &&my_trials range 1 8Then we appent the array &&my_trials with itelse, so after the following line, it will contain: 1,2,3,4,5,6,7,8,1,2,3,4,5,6,7,8.
set &&my_trials append &&my_trialsAnd the finally, we will shuffle these numbers around, but we do it such that there are no repeats in it. Thus, we might get something like: 3,2,5,8,1,4,7,6,2,4,3,7,8,1,6,5. It will be the sequence of tablerows that we are going to use in each task (see task where this was being explained already).
set &&my_trials shuffle no_repeatNext we tell PsyToolkit to do 16 trials of the search task. That is, the task search will be called 16x, that makes then 16 trials.
  tasklist
    search 16
  end
Finally, we show some feedback on screen. This is not always necessary, although I think it is a nice motivation for participants. People often want to know about what sort of experiment they participated in. In this case, the main point is that it is harder to find a target stimulus (the orange T) when there are more distractor stimuli.
Feedback has been described in detail elsewhere.. In short, we create four new global variables based on the data that has been saved by the save line. There is a specific way of doing this. The c5 refers to the fifth column of the data file, and the select selects the lines of the data file to include (when participants responded correctly). c2 is the number of stimuli presented (5, 10, 15, or 20), c4 is correct (0) or not, and c3 is the presence of a distractor.
  feedback
    set &RTfive    mean c5 ; select c3 == 1 && c4 ==0 && c2 == 5
    set &RTten     mean c5 ; select c3 == 1 && c4 ==0 && c2 == 10
    set &RTfifteen mean c5 ; select c3 == 1 && c4 ==0 && c2 == 15
    set &RTtwenty  mean c5 ; select c3 == 1 && c4 ==0 && c2 == 20
    text 0 0 "Search time (ms)"
    text 0  50 &RTfive    ; prefix "With  5 items: " ; postfix " ms"
    text 0 100 &RTten     ; prefix "With 10 items: " ; postfix " ms"
    text 0 150 &RTfifteen ; prefix "With 15 items: " ; postfix " ms"
    text 0 200 &RTtwenty  ; prefix "With 20 items: " ; postfix " ms"
    text 0 250 "Press space bar to continue"
  end